
Description:
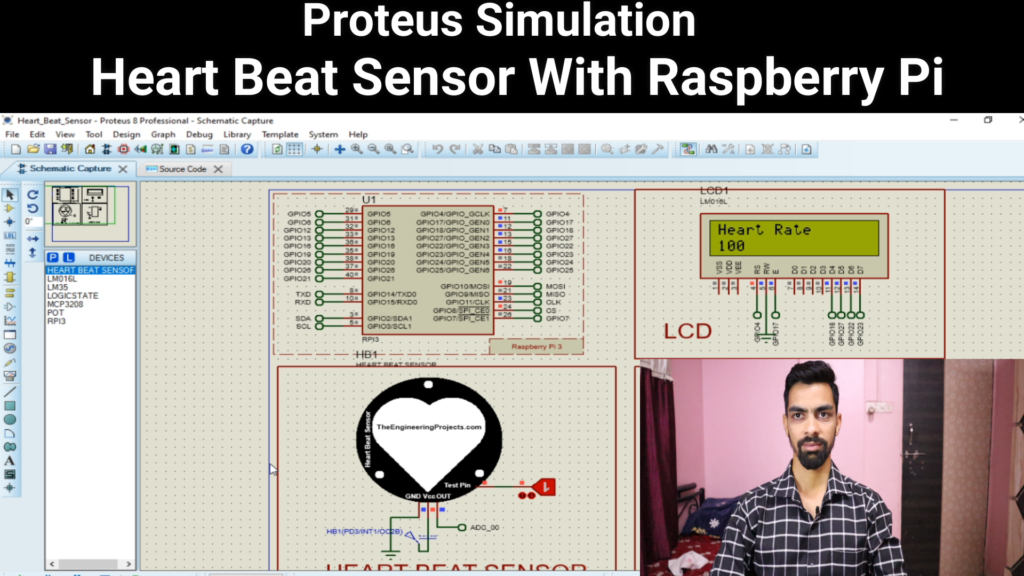
- The “Proteus Simulation of Heartbeat Sensor with Raspberry Pi” project demonstrates a virtual simulation of a heartbeat sensor integrated with a Raspberry Pi using the Proteus software.
- The project aims to showcase the functionality and interaction of a heartbeat sensor with a Raspberry Pi microcontroller. The simulation replicates the hardware components and their connections, allowing users to understand the operation and behavior of the system in a virtual environment.
- The heartbeat sensor, typically a pulse sensor, captures the heart rate of an individual and converts it into electrical signals. These signals are then processed by the Raspberry Pi to analyze and interpret the heart rate data.
- The simulation in Proteus provides a graphical representation of the sensor, Raspberry Pi, and the output data, allowing users to observe the changes in heart rate readings as simulated data is fed into the system.
- By simulating the heartbeat sensor with the Raspberry Pi in Proteus, users can gain insights into the working principles of the sensor, understand the data processing performed by the Raspberry Pi, and visualize the output results.
- This simulation project serves as a valuable learning tool for students, hobbyists, and developers interested in exploring the integration of heartbeat sensors with the Raspberry Pi. It allows users to experiment with different scenarios, analyze simulated data, and familiarize themselves with the sensor’s behavior and the Raspberry Pi’s role in processing and interpreting the data.
- In conclusion, the “Proteus Simulation of Heartbeat Sensor with Raspberry Pi” project provides a virtual environment to explore and understand the integration of a heartbeat sensor with the Raspberry Pi. The simulation offers an interactive and visual representation of the system, enabling users to learn and experiment with this technology without the need for physical hardware.
Project Code:
- Download project code from below button.
- If you want to understand code explanations then please watch YouTube video.
YouTube Video :
- If you want to understand how to connect hardware with Arduino Uno,
- And Program explanation for this project,
- And how to do this project by yourself then please watch our YouTube video
Purchase Readymade Project:
- If you want to purchase a readymade project from Mytrained.com then contact us on whatsapp.
- We do not encourage any student to purchase a readymade project from us. Our mission is to give complete knowledge free of cost.
- So from our end we already provide code and detailed steps to create this project by yourself in our YouTube video.
- So if you want to save your money then watch our video and follow the steps that are mentioned in the video.
- Once you purchase a project then it will take at least 1 month to design your project.
- You have to pay the complete project cost while placing the purchase order.
- no refund no exchange policy

Leave a Reply