
Description:
- The “Interface LED with Raspberry Pi” project focuses on the integration of an LED (Light Emitting Diode) with Raspberry Pi and explores different methods of controlling and blinking the LED using the Raspberry Pi platform. The project aims to provide a comprehensive understanding of how to interface and manipulate LEDs with Raspberry Pi, both in physical implementation and through Proteus simulation.
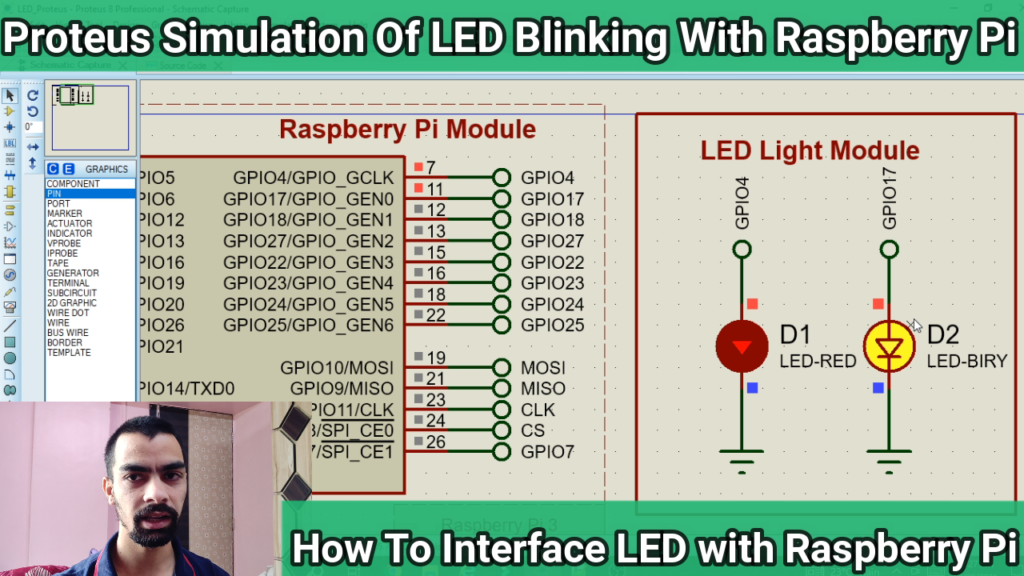
- The project demonstrates various techniques to control the LED, including directly connecting the LED to Raspberry Pi’s GPIO (General Purpose Input/Output) pins and programming the Raspberry Pi to toggle the state of the GPIO pins to turn the LED on or off. Additionally, the project explores the concept of blinking the LED by utilizing different time intervals and patterns.
- Proteus simulation is utilized to replicate the hardware setup and program the Raspberry Pi in a virtual environment. This enables users to test and validate the LED control functionalities without the need for physical components, allowing for a more efficient and cost-effective development process.
- By following the project, users will gain a clear understanding of how to interface an LED with Raspberry Pi, control its state, and create blinking patterns. They will also gain hands-on experience with both the physical implementation and simulation aspects, thereby strengthening their knowledge and skills in working with Raspberry Pi and GPIO pins.
- In summary, the “Interface LED with Raspberry Pi” project provides a comprehensive guide on how to interface and control LEDs using Raspberry Pi. The inclusion of Proteus simulation allows for experimentation and testing in a virtual environment. By following this project, users can gain practical knowledge of working with LEDs and Raspberry Pi, enabling them to apply these skills to a wide range of electronic projects and applications.
Software Require:
- You need to install the Proteus 8.9 version in your laptop.
Project Code:
- Download project code from below button.
- If you want to understand code explanations then please watch YouTube video.
YouTube Video:
- If you want to understand how to connect hardware with Raspberry Pi,
- And Program explanation for this project,
- And how to do this project by yourself then please watch our YouTube video.
Purchase Readymade Project:
- If you want to purchase a readymade project from Mytrained.com then contact us on whatsapp.
- We do not encourage any student to purchase a readymade project from us. Our mission is to give complete knowledge free of cost.
- So from our end we already provide code and detailed steps to create this project by yourself in our YouTube video.
- So if you want to save your money then watch our video and follow the steps that are mentioned in the video.
- Once you purchase a project then it will take at least 1 month to design your project.
- You have to pay the complete project cost while placing the purchase order.
- no refund no exchange policy

-
I got what you mean , appreciate it for posting.
Leave a Reply