
Description:
- This research project focuses on simulating an Infrared (IR) sensor in the Proteus software environment and integrating it with a Raspberry Pi to perform obstacle detection. The IR sensor is a popular choice for proximity sensing, making it suitable for various applications, including obstacle detection in robotics and automation. The project aims to create an accurate and reliable virtual simulation of the IR sensor and showcase its practical implementation in obstacle detection using the Raspberry Pi interface.
- The main objectives of this project are as follows:
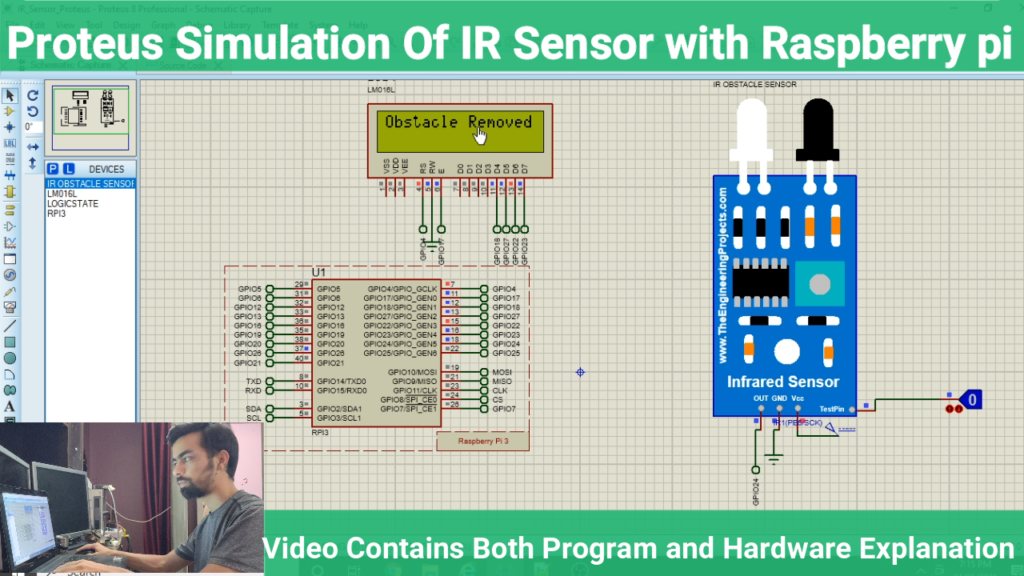
- IR Sensor Simulation: The IR sensor is virtually modeled in Proteus to mimic its behavior in the real world. The simulation includes defining the sensor’s sensitivity, detection range, and analog or digital output characteristics based on the proximity of objects emitting or reflecting infrared radiation.
- Raspberry Pi Interface: The Raspberry Pi is integrated into the virtual simulation to act as the interface between the simulated IR sensor and the obstacle detection algorithm. It reads the sensor data in real-time and processes the information to detect obstacles.
- Obstacle Detection Algorithm: A robust obstacle detection algorithm is implemented in the Raspberry Pi to analyze the IR sensor’s data. The algorithm interprets the sensor readings and identifies the presence and distance of obstacles within the sensor’s range.
- Visualization and Feedback: The simulation includes a graphical user interface (GUI) to display the IR sensor’s output, the detected obstacles, and their respective distances. The GUI provides real-time feedback, allowing users to observe the obstacle detection process.
- The simulation process involves the following steps:
- a. IR Sensor Simulation: The virtual IR sensor is set up in Proteus with accurate parameters, such as the emission and detection of infrared radiation, the response curve, and the output characteristics. The simulation ensures that the sensor’s output varies based on the proximity of obstacles.
- b. Raspberry Pi Integration: The Raspberry Pi is virtually connected to the IR sensor in Proteus, emulating the actual sensor data acquisition process. It reads the sensor’s analog or digital output values, representing the proximity of obstacles.
- c. Obstacle Detection Algorithm: The Raspberry Pi’s virtual environment incorporates an obstacle detection algorithm. The algorithm processes the sensor data and determines the presence and distance of obstacles based on predefined thresholds and calibration.
- d. Visualization and Feedback: The GUI in Proteus displays the IR sensor’s output and overlays detected obstacles on a virtual environment. Users can observe how the algorithm detects obstacles and the distances from the IR sensor.
- The success of this research project is assessed based on the accuracy and reliability of the simulated IR sensor’s behavior, the efficiency of the obstacle detection algorithm, and the user-friendliness of the visualization.
- In conclusion, this research presents an effective and practical simulation of an IR sensor in Proteus, coupled with a Raspberry Pi interface for obstacle detection. The project demonstrates the feasibility of using virtual simulations for testing and optimizing obstacle detection systems, providing valuable insights for real-world implementations in robotics and automation applications.
Software Require:
- You need to install the Proteus 8.9 version in your laptop.
- You also need to install IR sensor library in your proteus software .
- Detail steps explain in YouTube Video.
Project Code:
- Download project code from below button. If you want to understand code explanations then please watch YouTube video.
YouTube Video:
- If you want to understand how to connect hardware with Raspberry Pi,
- And Program explanation for this project,
- And how to do this project by yourself then please watch our YouTube video.
Purchase Readymade Project:
- If you want to purchase a readymade project from Mytrained.com then contact us on whatsapp.
- We do not encourage any student to purchase a readymade project from us. Our mission is to give complete knowledge free of cost.
- So from our end we already provide code and detailed steps to create this project by yourself in our YouTube video.
- So if you want to save your money then watch our video and follow the steps that are mentioned in the video.
- Once you purchase a project then it will take at least 1 month to design your project.
- You have to pay the complete project cost while placing the purchase order.
- no refund no exchange policy

-
some genuinely interesting information, well written and broadly speaking user friendly.
-
I genuinely treasure your work, Great post.
Leave a Reply