

Introduction
- In recent years, there has been a growing interest in using robotics for firefighting applications to enhance safety and efficiency. This project focuses on designing a Fire Fighting Robot using Arduino, equipped with flame sensors to detect fire, a mobile platform for movement, and a mini water pump for fire extinguishing.
Components Used
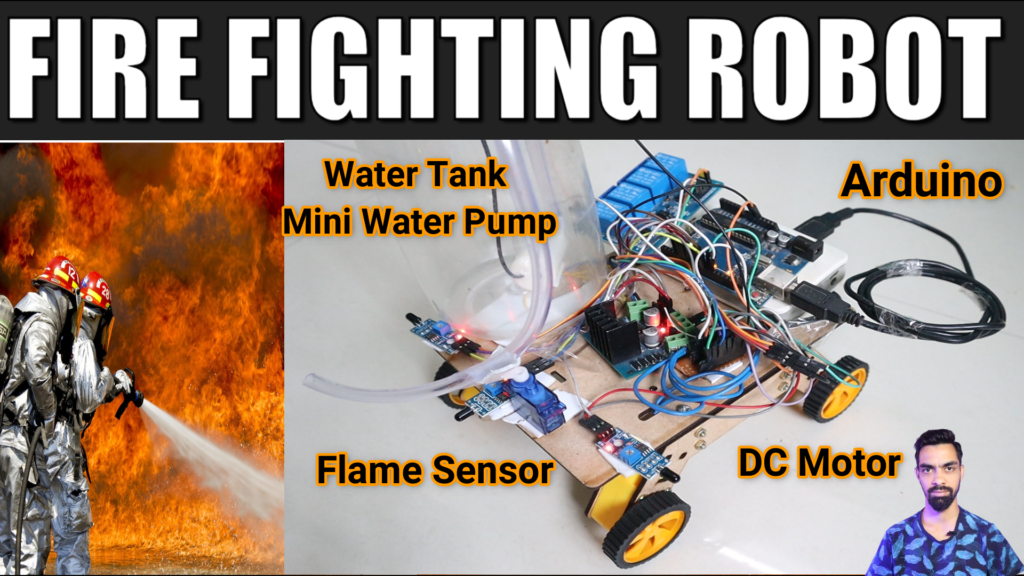
- Arduino UNO (or similar microcontroller)
- 3 Flame Sensors (e.g., IR Flame Sensor Module)
- Chassis and Motors for robot movement
- Mini Water Pump
- Servo Motor (to control the pump’s nozzle direction)
- Battery Pack (to power the robot)
- Wheels and motor drivers (if using DC motors)
- Connecting wires and breadboard
Functionality and Operation
- Flame Detection: The robot is equipped with three flame sensors strategically placed to detect flames. These sensors will continuously monitor their surroundings.
- Movement Control: Upon detecting a flame, the Arduino will process the sensor data to determine the direction of the fire source. The robot will autonomously move towards the fire location using DC motors and wheels.
- Fire Extinguishing Mechanism:
- Water Pump Activation: Once the robot reaches the fire, a mini water pump is activated to supply water.
- Servo Motor Control: A servo motor adjusts the nozzle of the water pump to direct the water towards the flames accurately.
- Extinguishing Process: The water pump sprays water onto the fire, helping to extinguish it. The amount of water and duration of pumping can be controlled via the Arduino program.
Hardware Assembly:
- Mount the Arduino board on the chassis.
- Connect the DC motors to the motor drivers and Arduino for movement control.
- Wire the flame sensors to analog/digital input pins on the Arduino.
- Connect the mini water pump to an output pin (via a transistor if needed for higher current).
- Software Programming:
- Write the Arduino program to read data from flame sensors and control the robot’s movement.
- Implement algorithms for flame detection and localization based on sensor inputs.
- Program the servo motor to adjust the nozzle direction based on fire location data.
- Develop control logic for the water pump to regulate water flow and duration.
- Testing and Calibration:
- Conduct initial tests to ensure each component (flame sensors, motors, pump, servo) works correctly.
- Calibrate the flame sensors to detect varying intensities of flames accurately.
- Fine-tune movement algorithms to optimize the robot’s navigation towards fires.
Conclusion
- The Fire Fighting Robot using Arduino offers a practical solution for detecting and extinguishing fires autonomously. By integrating flame sensors, a mobile platform, and a mini water pump controlled by a servo motor, the robot can effectively respond to fire incidents, enhancing safety in potentially hazardous environments.
- This project not only demonstrates the application of robotics in firefighting but also provides a platform for further enhancements and integrations, such as remote monitoring and control via wireless communication or advanced sensor technologies.
Project Code:
- Download project code from below button.
- If you want to understand code explanations then please watch YouTube video.
YouTube Video:
- If you want to understand how to connect hardware with Arduino,
- And Program explanation for this project,
- And how to do this project by yourself then please watch our YouTube video.
Purchase Readymade Project:
- If you want to purchase a readymade project from Mytrained.com then contact us on whatsapp.
- We do not encourage any student to purchase a readymade project from us. Our mission is to give complete knowledge free of cost.
- So from our end we already provide code and detailed steps to create this project by yourself in our YouTube video.
- So if you want to save your money then watch our video and follow the steps that are mentioned in the video.
- Once you purchase a project then it will take at least 1 month to design your project.
- You have to pay the complete project cost while placing the purchase order.
- no refund no exchange policy

-
👌👌👌👌
Leave a Reply